Showing posts with label Wedding. Show all posts

1.19.2012

Floral Alternatives...Paper Bouquets & Decor, DUH!

Let's suppose you aren't a huge fan of flowers, since they will end up dead and withered away within a few days...aaaaand spending a couple thousand dollars on said flowers is totally NOT in your budget.
I now propose an eco-and-pocketbook-friendly alternative, and if you're a true DIY'er you won't mind the time involved in creating this wondrous project...PAPER BOUQUETS! (OR BROOCH BOUQUETS, whichever you prefer). I will be posting a tutorial on creating the latter within the next few days so stay tuned folks.
(Brooch bouquet)
Now, you have to admit that paper flowers are darn cute. This is also not to mention the fantastic effect they will have on your pocketbook. Most paper bouquets are constructed from pages out of old books, newspaper, magazine clippings, or you can find some fancy stock/scrapbooking paper from your local craft store. Use any pattern you want to create a nice addition to your wedding decor. Bold contrasts are my personal favorite.
And honestly, they don't lack any bit of "elegance" or "fancy" or whatever you want to call it. It's a handmade project, which in my opinion, will not only last longer, but create better memories during the creation process as well. And the absolute best part is, you're not limited to one type of flower.
For the Kusudama tutorial, click here.
For the Ocasiocasa tutorial, click here.
For the Dahlia tutorial, click here
There's also a bazillion different varieties of roses and other florals that you can make as well. Round roses, spray garden roses, etc.
Have fun with this project, and happy flower making!
XOXO-Christina

11.02.2011

Guest Book Alternative: Custom Skateboard Deck


Freakin awesome!! A refinished skateboard deck that has a picture of the couple (secured with resin), and room for their fam and friends to leave words of wisdom and ♥. In my opinion, this beats those boring old traditional guest books. HANDS DOWN. What a cool way to leave a memory of your special day hanging in your house. Let me know if you need some DIY instructions.

xoxo, Christina

10.30.2011

Would You? A Bride In Black...

Bethany & Doug were married in Nashville, TN. The bride wore a black Betsey Johnson dress. “My dress was a big deal,” she began. “I had originally purchased a vintage inspired white dress and the bridesmaids were going to wear black but I kept thinking about a photo I had seen of a model bride in black that our photographer had used as an ad for her studio. I really wanted to wear black but I was having a hard time finding one that didn’t look goth, since that’s not my style at all.”
So in the end, Bethany wore black and her bridesmaids wore white! She told her bridesmaids they could wear any white dress they wanted so they all picked their own, “I was lucky that none of the bridesmaids had bought their dresses before I found mine, so it was okay with them to get a white dress instead of black. I am so happy that I went with the black dress because it was exactly what I wanted! I wanted my bridesmaids to have something that they liked and would show off their personal styles. I had chosen each one for different reasons including their different personalities so their dresses came from everywhere from a vintage shop to Bebe.  They also picked their own shoes after I asked them to choose different colors. They also wore hair pieces that I had made for them as part of their thank you gifts.”

 “I would call our wedding theme ‘random’ (as did Doug when I asked him!)” the bride continued, “That’s also how I would describe us. I am happy to say that we don’t really fit into a category. We had elements that were vintage, eco-friendly, rockabilly and modern.”
“I was inspired by so many different places, it’s hard to know where to start. I definitely kept Rock n Roll Bride bookmarked and checked back often.  I was originally looking at a lot of mainstream wedding magazines when we first got engaged but they were a little ridiculous.  They make everything look so easy when really a lot things that they feature are pretty difficult and mostly way too expensive, so I put them down and started searching the internet for things that Doug and I liked and tried to incorporate them.”


Etsy is full of inspiration.  So many times I would be browsing a category on and find something that was similar to what I wanted but that I could make my own.  Really, I just tried to keep my eyes open and whatever I saw anywhere that I liked I tried to figure out how to put it in the wedding.”


So the question remains, would you? I think this bride has pulled off the impossible and looks fantastic while doing it. She knew exactly what she wanted and went for it! All stigma aside, a wedding is what YOU envision. Who knows, your "crazy" idea may end up just as awe-inspiring...Cheesy, but just like Nike says...just do it. All credit and photography for this blogpost goes to the amazaballs Rock n' Roll Bride.

9.02.2011

DIY Project: Making Your Cupcakes Cute

If you are like me, you browse through countless wedding blogs whenever humanly possible. I love seeing all the lovely little details of DIY weddings and stare longingly, wondering how to share them with you all. Today I wanted to try those cute little cupcake signs that have been seen on 
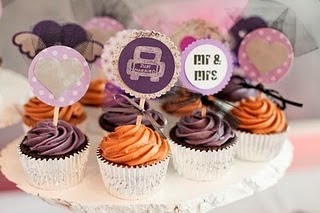
Style Me Pretty. Here's an inspiration picture.

How cute are these?? But they are $9 for a set of 12, and that could add up really fast, especially if you have a large guest list. For example, if your guest list is 150, you would need 13 sets of 12, which comes out to (carry the 3, subtract the 1) $113. But enough blabbling, on to your DIY instructions...

Supplies needed (can be found in any craft supply store):

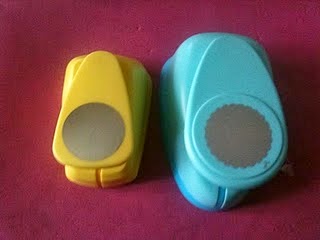
  • Big scalloped-edge hole-puncher (2 inch)
  • Slightly smaller circle hole puncher (1.5 inch)
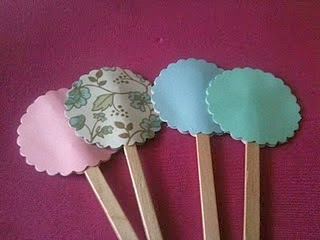
  • “Woodsies” wooden sticks (5.75 inch)
  • Glue sticks & hot glue gun
  • Cute construction or scrap-booking paper
  • Letter stickers

Here is a closer look at the hole-puncher's:

Start by cutting out a few of each of the circles, playing around with the patterns and colors from the card stock you have. Then, hot-glue the circle onto the stick (or use Zots if you don't want to use a messy glue gun). If you don't want to leave the stick exposed on the back, glue the matching color onto the back.
 

Next, apply some sticker letters, or quotes to the circles. Mix it up by using different sayings such as:
Your monogram or initials,We Do, I Do,Love,Kiss,Sweet,Just Wed,In Love,Happy,Mrs, Mr, ...etc


All in all, these will turn out so cute!! Not to mention, they are sooooo ridiculously easy to make! This DIY trend has been popping up everywhere, and I love the idea of cupcakes instead of a traditional cake, or in addition to a traditional cake. There's many uses for these: think drink stirrers, attached to favor bags, "toss me" bags, at the bar or dessert table....the list goes on and on!

{Courtesy of Miss Petit Four of Weddingbee}

8.22.2011

Flag Pennant Wedding Decor


They're kinda whimsical, they're kinda cute, and they're kinda becoming a HUGE trend in weddings. These string along pennant accents are used all over the place: as decor for a dessert or sweetheart table, lining the ceilings of reception halls everywhere, and as cake toppers. What makes these even more awesome is the fact that they're a CINCH to make and only cost a few bucks...go DIY'ers. At first, the simplistic look didn't quite catch my eye, but after seeing the plethora of ways possible to use this decor concept, I was sold. Popular banners I've been seeing are: draped over the candy buffet (love is sweet), bride and groom photos (i.e. wedding date 6.2.2012), on the back of the getaway vehicle (just married), draped over the sweetheart table, as cake toppers, swizzle sticks, etc, etc, etc! Check out the images below and see why I'm falling in love with this decor.

8.05.2011

DIY Project - Wooden Table Numbers

As a savvy spender (aka cheap, price aware, whatever you want to call it), I'm always one lookout for DIY projects that will save my clients a few extra bucks. As we all know, the cost of hosting such an elaborate event (perhaps the most important and detailed event you will ever host, ever)....quickly rises. Anytime a vendor hears the word wedding - I'm pretty sure dollar signs start flashing before their eyes. As a firm believer in the fact that newlyweds should not start out their life of matrimony in debt, DIY projects are my fave. Why pay the extra cash when you have the tools and skills necessary to "do it yourself!"

So enjoy... and continue to visit our blog for more projects and inspiration to help you as you plan your perfect day!


Materials:
- Downed wood (we chose Aspen since it is abundant in our neighborhood, and found a pile of downed trees just a few blocks away- it also happened to be the perfect size I was looking for)
- Chain Saw
- Dremmel with 1/4 inch straight router bit
- Ruler
- Pen
- Dark colored paint + Paint Brush


Step 1: Find your wood
Step 2: Use a pen and ruler to mark each increment where you want to make your cuts. You can decide how thick or thin you would like the wood to be, but we chose about 1 1/2 inches (this width enabled the numbers to stand alone or lean against something)
Step 3: Make your cuts. We found a chainsaw to be the most fast, effective way- but my cuts weren’t perfect. Please take care to adhere to proper chainsaw safety (proper eye protection is a must!)- I had my fiancee give me a lesson before we got started. (Note- wood will be grainy when cut with a chainsaw- I liked this look, but if you wanted something more refined you could add an extra step here with a power sander).
Step 4: Make sure you have enough wood rounds for each table.


Source: 100 Layer Cake (a very  awesome blog, check them out!)
Xoxo,
Christina Pectol
ENVY EVENTS
M: 253.468.5586
W:
envyeventsco.com
Like us on facebook! www.facebook.com/envyeventsco

Step 5: Once you have enough wood rounds for each table number, take a dark pencil or pen and make an outline of each number on the round for you to trace with the dremmel.
Step 6: Use dremmel to “drill into the wood” along the numbers you’ve traced
Step 7: Use brown paint and a skinny paintbrush to paint in indentations.

7.30.2011

Envy Events Portfolio: Angela and Rob

Check out these beautiful photos from Rob and Angela's Wedding. Envy Events delightfully acted as the primary event coordinator - and supported the bride and groom from "Will you marry me" to "I DO". Angela needed help creating her DIY invites, finding the reception location, securing all of her vendors (photographer, bakery, musician, rentals, floral) - and Envy Events paved the way so Angela could stress a little less. :) The reception was held at the charming Pantages Theatre in Tacoma, WA.

Check out the entire gallery here.