Showing posts with label gifts. Show all posts

11.02.2011

Guest Book Alternative: Custom Skateboard Deck


Freakin awesome!! A refinished skateboard deck that has a picture of the couple (secured with resin), and room for their fam and friends to leave words of wisdom and ♥. In my opinion, this beats those boring old traditional guest books. HANDS DOWN. What a cool way to leave a memory of your special day hanging in your house. Let me know if you need some DIY instructions.

xoxo, Christina

10.23.2011

DIY Project: Personalized Photo Tile Coasters

Photo Tile Coasters {Using Resin}
These photo coasters make a GREAT gift for the hubby to be, the parentals, wedding party, etc! And not only are they cheap and easy to make, emphasis on the word CHEAP...it's something the receipient will likely cherish and USE for many years to come. They can be used to keep your adult beverages from dirtying up the coffee table, or placed in a display for show on a wall. Buy some coasters from the store for someone and they may end up in the regift bin; however handmade photo coasters make for a heartfelt gift, that will definitely put a smile on their face. I give full credit for this post to the most awesome Oopsey Daisy over at TipJunkie. Check out the below tutorial and happy coaster-making!
Using resin is an awesome way to memorialize and create projects that will last through rain or shine. It creates a sealed barrier that protects the contents inside, and if the directions are followed precisely, will leave a nice smooth, shiny (almost glass-like) finish. Be sure to follow the directions to a "T" with whichever resin you choose to go with. Once you get it down, you will fall in love with this product, and more will be used for sure in your creative future. 
Here’s how to create these AMAZEBALLS photo coasters…
Start out with a trip to Home Depot.  These 4×4 tiles are only 19 cents each!  It doesn’t get much cheaper than that!  And pick up a package of 72 felt mounting circles for approximately $3.50.  Not too shabby!


Next, you need to order some photo prints. Only 13 cents each at Costco!  Then, cut the prints down to 4"x4" so they will fit on each tile. 


A regular old Elmer’s glue stick can be used to paste each picture onto the tiles.  (I love glue sticks–you can’t leave fingerprints with glue sticks!!)  Try to get the acid-free kind that is safe to use with photos.

We won’t give a full tutorial on using resin because each product is a little different.  For this project we used Envirotex Lite, and followed the instructions on their website very precisely.  The key to using resin is precision.  So be careful, perhaps do a trial run on an extra tile and you should get a high gloss finish that is absolutely beautiful!

After mixing the resin with the hardener, you just pour it on!  Then spread it out using popsicile sticks.  If you have a blow torch, you can use it, ON LOW, to get out the bubbles that pop up in the first 15 minutes or so.  But do you have to use a blow torch?? The answer is NO!  You can blow through a straw, blowing out the bubbles in the very same way.
It should take a full 24 hours to harden up!  Maybe a bit longer, at the longest, up to 72 hours to get completely hard.

Once dry, mount 4 of the felt circles on the bottom of each tile so they can slide easily on wood or any surface without scratching!

Then woooo-hooooo....ALL DONE!  Give yourself a well-deserved pat on the back for creating a frugal, yet very awesome gift. Go DIY'ers - you rock!

Tie them up with a bow and you have the PERFECT gift!  Use these for an anniversary, christmas present, or if you really want to go all out - as favors at your wedding.  As you can see from the tutorial, the time involved isn't unbearably long, but to finish the project for 50-100 pieces will require some dedication as well as some help from a few rock star friends.  Black and white photos create a stunning effect, but color works amazingly well too. 

Now these are just stinkin’ cute!!  Grandparents are sure to adore this project if made with pictures of the little bebe's. 

Two sets of coasters (and enough supplies for a third!) – for less than $10 total.  Awesome possum!!

8.20.2011

Jones Soda Custom Bottle Labels


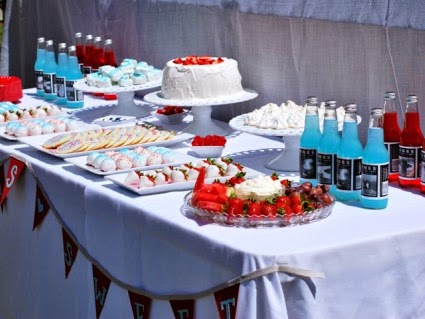
I found a pretty sweet treat for y'all while browsing on WedLoft.com. If you're in search of an adorable, colorful way to personalize your reception/event, look no more. Why is that, you ask? Because I've found custom bottle labels courtesy of Jones Soda! This Seattle-based company not only offers bev's that are yummy, they're eye candy as well. They come in a wide variety of flavors and colors, and the labels can be fully customized to include a personal photo, blurb about yourself, or any information you deem necessary. At $29.99 per case of 12, these aren't the most budget-friendly alternative to water bottle labels, however, the glass bottle and design altogether hints toward an added level of attention to detail and class. Check out the photos below, and you'll see why.


Here's an original way to display place cards! Attach a tag to the bottle, and offer your party guests a sweet drink when they arrive. It's sure to be a conversation starter that everyone will appreciate. Add your own text, images, and create a one-of-a-kind party favor! 


Use the bottles to add a POP of color to any dessert table!


They also serve a dual purpose...party favor / drinks for the guests!

(All images courtesy of WedLoft.com)

8.05.2011

DIY Project - Wooden Table Numbers

As a savvy spender (aka cheap, price aware, whatever you want to call it), I'm always one lookout for DIY projects that will save my clients a few extra bucks. As we all know, the cost of hosting such an elaborate event (perhaps the most important and detailed event you will ever host, ever)....quickly rises. Anytime a vendor hears the word wedding - I'm pretty sure dollar signs start flashing before their eyes. As a firm believer in the fact that newlyweds should not start out their life of matrimony in debt, DIY projects are my fave. Why pay the extra cash when you have the tools and skills necessary to "do it yourself!"

So enjoy... and continue to visit our blog for more projects and inspiration to help you as you plan your perfect day!


Materials:
- Downed wood (we chose Aspen since it is abundant in our neighborhood, and found a pile of downed trees just a few blocks away- it also happened to be the perfect size I was looking for)
- Chain Saw
- Dremmel with 1/4 inch straight router bit
- Ruler
- Pen
- Dark colored paint + Paint Brush
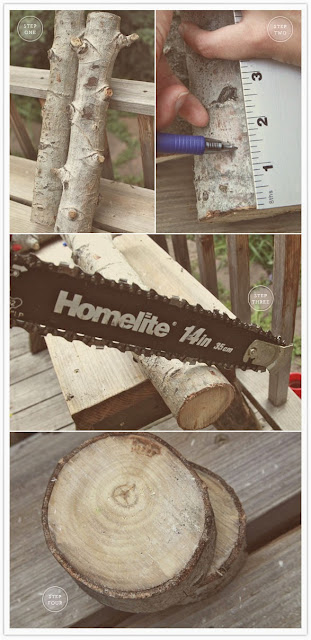

Step 1: Find your wood
Step 2: Use a pen and ruler to mark each increment where you want to make your cuts. You can decide how thick or thin you would like the wood to be, but we chose about 1 1/2 inches (this width enabled the numbers to stand alone or lean against something)
Step 3: Make your cuts. We found a chainsaw to be the most fast, effective way- but my cuts weren’t perfect. Please take care to adhere to proper chainsaw safety (proper eye protection is a must!)- I had my fiancee give me a lesson before we got started. (Note- wood will be grainy when cut with a chainsaw- I liked this look, but if you wanted something more refined you could add an extra step here with a power sander).
Step 4: Make sure you have enough wood rounds for each table.


Source: 100 Layer Cake (a very  awesome blog, check them out!)
Xoxo,
Christina Pectol
ENVY EVENTS
M: 253.468.5586
W:
envyeventsco.com
Like us on facebook! www.facebook.com/envyeventsco

Step 5: Once you have enough wood rounds for each table number, take a dark pencil or pen and make an outline of each number on the round for you to trace with the dremmel.
Step 6: Use dremmel to “drill into the wood” along the numbers you’ve traced
Step 7: Use brown paint and a skinny paintbrush to paint in indentations.

3.17.2009

Etsy.com = Online ADDICTION!

Photobucket

Whether you're looking for a monogrammed chair tie or a cake topper that different than the typical b & g figurines...etsy.com will likely have what you heart most desires! Etsy is a site where talented crafters and artsy folks alike post and sell their handmade, UNIQUE items. This can be especially helpful if you're not quite the skilled project master or just simply don't have the time to take on any DIY projects. There is soooo much to be said about having an item that is not mass-produced...knowing that you are in possession of a "one of a kind makes" it more intriguing and special. So check it out, you'll be glad you did - promise!

12.08.2008

Personalized Favors


Hi everyone-

Just wanted to let you all know, in case you didn't already know, Envy Events offers a complete line of personalized favors, bridal party gifts, & wedding day accessories. We have many styles for you to choose from - dramatic, romantic, contemporary - you name it. FYI: This isn't a service that we offer to just anyone. Because we take such a customized approach to the process, we usually only extend our services to our current clients.

Here's how it works by default: we get together and help you to become familiar with the many options & products available to you. Then, you get to make the decision on (as the ultimate decision maker!) what works best with the overall theme and budget (always mindful of the bottom line- especially with the economy the way that it is).
The perks to placing an order with us is that you always have someone who is knowledgable and ready to answer (*or find answers to) all of your questions regarding shipment time, font selection, color options, pricing, & quantities needed.
Here's a small display of some of our most requested items. Remember, everything can be ordered blank -or- personalized with your name(s) or monogram (at much less the cost than what similiar companies are offering).