1.19.2012

Floral Alternatives...Paper Bouquets & Decor, DUH!

Let's suppose you aren't a huge fan of flowers, since they will end up dead and withered away within a few days...aaaaand spending a couple thousand dollars on said flowers is totally NOT in your budget.
I now propose an eco-and-pocketbook-friendly alternative, and if you're a true DIY'er you won't mind the time involved in creating this wondrous project...PAPER BOUQUETS! (OR BROOCH BOUQUETS, whichever you prefer). I will be posting a tutorial on creating the latter within the next few days so stay tuned folks.
(Brooch bouquet)
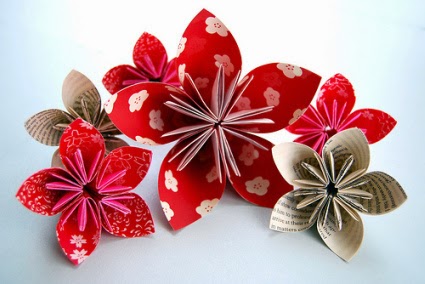
Now, you have to admit that paper flowers are darn cute. This is also not to mention the fantastic effect they will have on your pocketbook. Most paper bouquets are constructed from pages out of old books, newspaper, magazine clippings, or you can find some fancy stock/scrapbooking paper from your local craft store. Use any pattern you want to create a nice addition to your wedding decor. Bold contrasts are my personal favorite.
And honestly, they don't lack any bit of "elegance" or "fancy" or whatever you want to call it. It's a handmade project, which in my opinion, will not only last longer, but create better memories during the creation process as well. And the absolute best part is, you're not limited to one type of flower.
For the Kusudama tutorial, click here.
For the Ocasiocasa tutorial, click here.
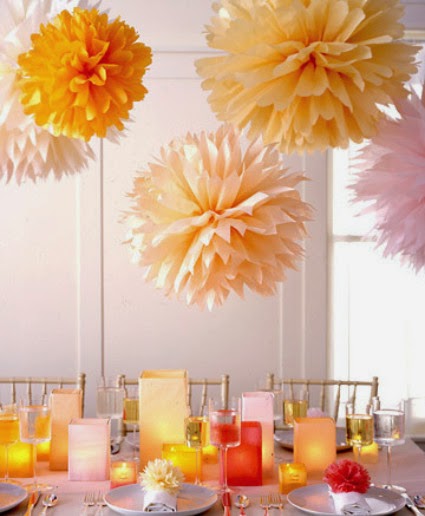
For the Dahlia tutorial, click here
There's also a bazillion different varieties of roses and other florals that you can make as well. Round roses, spray garden roses, etc.
Have fun with this project, and happy flower making!
XOXO-Christina

12.30.2011

Mini Obsession: POLKA DOTS!

Lately I've found myself drawn to all things polka dots...don't ask why. Perhaps I was deprived of them as a child? Possibly. The whimsical nature of polka dotted items add instant "fun" factor to any event. Mix and add different colors, and perhaps some gingham and floral patterns, and you've got yourself a fun soiree. Check out some of my love's below and the reason for my new-found addiction.
Hope you enjoyed all the loveliness. Have a safe and happy new years all!
-Christina

12.12.2011

Rain Isn't Always a Dreary Thing...

Not going to lie, I teared up a little after seeing this. To try and not lose any effect, I will tell the story of this romantic proposal just as the photographer did. Get ready for the happy tissues.

After watching the ducks for awhile, a couple came strolling down the walkway, hand in hand.
CentralParkProposal1.jpg

Only to stop on top of Bow Bride. He held her hand, kissed her, and talked for a few minutes.
CentralParkProposal2.jpg
Then it happened...
CentralParkProposal3.jpg
She was shocked, let out a scream, and forgot that she was holding onto an umbrella.
CentralParkProposal4.jpg

CentralParkProposal5.jpg
They held, and kissed, and said sweet nothings to each other. They were on cloud nine!
CentralParkProposal6.jpg
And then it sank in...
CentralParkProposal7.jpg
CentralParkProposal8.jpg

CentralParkProposal9.jpg
All credit and imagery compliments of Shay Stevens.

11.02.2011

Guest Book Alternative: Custom Skateboard Deck


Freakin awesome!! A refinished skateboard deck that has a picture of the couple (secured with resin), and room for their fam and friends to leave words of wisdom and ♥. In my opinion, this beats those boring old traditional guest books. HANDS DOWN. What a cool way to leave a memory of your special day hanging in your house. Let me know if you need some DIY instructions.

xoxo, Christina

10.30.2011

Would You? A Bride In Black...

Bethany & Doug were married in Nashville, TN. The bride wore a black Betsey Johnson dress. “My dress was a big deal,” she began. “I had originally purchased a vintage inspired white dress and the bridesmaids were going to wear black but I kept thinking about a photo I had seen of a model bride in black that our photographer had used as an ad for her studio. I really wanted to wear black but I was having a hard time finding one that didn’t look goth, since that’s not my style at all.”
So in the end, Bethany wore black and her bridesmaids wore white! She told her bridesmaids they could wear any white dress they wanted so they all picked their own, “I was lucky that none of the bridesmaids had bought their dresses before I found mine, so it was okay with them to get a white dress instead of black. I am so happy that I went with the black dress because it was exactly what I wanted! I wanted my bridesmaids to have something that they liked and would show off their personal styles. I had chosen each one for different reasons including their different personalities so their dresses came from everywhere from a vintage shop to Bebe.  They also picked their own shoes after I asked them to choose different colors. They also wore hair pieces that I had made for them as part of their thank you gifts.”

 “I would call our wedding theme ‘random’ (as did Doug when I asked him!)” the bride continued, “That’s also how I would describe us. I am happy to say that we don’t really fit into a category. We had elements that were vintage, eco-friendly, rockabilly and modern.”
“I was inspired by so many different places, it’s hard to know where to start. I definitely kept Rock n Roll Bride bookmarked and checked back often.  I was originally looking at a lot of mainstream wedding magazines when we first got engaged but they were a little ridiculous.  They make everything look so easy when really a lot things that they feature are pretty difficult and mostly way too expensive, so I put them down and started searching the internet for things that Doug and I liked and tried to incorporate them.”


Etsy is full of inspiration.  So many times I would be browsing a category on and find something that was similar to what I wanted but that I could make my own.  Really, I just tried to keep my eyes open and whatever I saw anywhere that I liked I tried to figure out how to put it in the wedding.”


So the question remains, would you? I think this bride has pulled off the impossible and looks fantastic while doing it. She knew exactly what she wanted and went for it! All stigma aside, a wedding is what YOU envision. Who knows, your "crazy" idea may end up just as awe-inspiring...Cheesy, but just like Nike says...just do it. All credit and photography for this blogpost goes to the amazaballs Rock n' Roll Bride.

10.23.2011

DIY Project: Personalized Photo Tile Coasters

Photo Tile Coasters {Using Resin}
These photo coasters make a GREAT gift for the hubby to be, the parentals, wedding party, etc! And not only are they cheap and easy to make, emphasis on the word CHEAP...it's something the receipient will likely cherish and USE for many years to come. They can be used to keep your adult beverages from dirtying up the coffee table, or placed in a display for show on a wall. Buy some coasters from the store for someone and they may end up in the regift bin; however handmade photo coasters make for a heartfelt gift, that will definitely put a smile on their face. I give full credit for this post to the most awesome Oopsey Daisy over at TipJunkie. Check out the below tutorial and happy coaster-making!
Using resin is an awesome way to memorialize and create projects that will last through rain or shine. It creates a sealed barrier that protects the contents inside, and if the directions are followed precisely, will leave a nice smooth, shiny (almost glass-like) finish. Be sure to follow the directions to a "T" with whichever resin you choose to go with. Once you get it down, you will fall in love with this product, and more will be used for sure in your creative future. 
Here’s how to create these AMAZEBALLS photo coasters…
Start out with a trip to Home Depot.  These 4×4 tiles are only 19 cents each!  It doesn’t get much cheaper than that!  And pick up a package of 72 felt mounting circles for approximately $3.50.  Not too shabby!


Next, you need to order some photo prints. Only 13 cents each at Costco!  Then, cut the prints down to 4"x4" so they will fit on each tile. 


A regular old Elmer’s glue stick can be used to paste each picture onto the tiles.  (I love glue sticks–you can’t leave fingerprints with glue sticks!!)  Try to get the acid-free kind that is safe to use with photos.

We won’t give a full tutorial on using resin because each product is a little different.  For this project we used Envirotex Lite, and followed the instructions on their website very precisely.  The key to using resin is precision.  So be careful, perhaps do a trial run on an extra tile and you should get a high gloss finish that is absolutely beautiful!

After mixing the resin with the hardener, you just pour it on!  Then spread it out using popsicile sticks.  If you have a blow torch, you can use it, ON LOW, to get out the bubbles that pop up in the first 15 minutes or so.  But do you have to use a blow torch?? The answer is NO!  You can blow through a straw, blowing out the bubbles in the very same way.
It should take a full 24 hours to harden up!  Maybe a bit longer, at the longest, up to 72 hours to get completely hard.

Once dry, mount 4 of the felt circles on the bottom of each tile so they can slide easily on wood or any surface without scratching!

Then woooo-hooooo....ALL DONE!  Give yourself a well-deserved pat on the back for creating a frugal, yet very awesome gift. Go DIY'ers - you rock!

Tie them up with a bow and you have the PERFECT gift!  Use these for an anniversary, christmas present, or if you really want to go all out - as favors at your wedding.  As you can see from the tutorial, the time involved isn't unbearably long, but to finish the project for 50-100 pieces will require some dedication as well as some help from a few rock star friends.  Black and white photos create a stunning effect, but color works amazingly well too. 

Now these are just stinkin’ cute!!  Grandparents are sure to adore this project if made with pictures of the little bebe's. 

Two sets of coasters (and enough supplies for a third!) – for less than $10 total.  Awesome possum!!

Barbie & Ken Finally Get Married!

Men, beware. This post may be a little too girly for your liking. You might just want to cover your eyes and stop reading right this second (warning that you will probably end up barfing if you read any further)...as for the ladies, this blog post is likely to bring back memories of all those fun role-playing games we used to play as kids. You know, Barbie and Ken...playing house...making the dolls get married and forcing Ken to obey Barbie's every wish (to include cleaning the house, cooking dinner, doing the grocery shopping, backrubs, etc...umm keep on dreaming right!?). I always used to make my younger sister play as Ken and I was always Miss Barbie (but that's just the bossy older sibling part of my personality shining through).

Anyhow, I originally came across this post on the Rock n' Roll Bride's blog, and I just had to share! A little freaky, that someone would spend the time posing the dolls, and getting all these shots, but CUTE and FUN nonetheless. The detail involved for this playtime photo shoot is so realistic, and the detail is fantastic. Check out Barbie and her bridesmaids getting ready, then Ken and his groomsmen...and finally on to the reception, where Barbie and Ken have their first dance, enjoy some adult beverages, and pose for the photo op.


Hope you enjoyed this one as much as I did. XOXO, Christina.