They're kinda whimsical, they're kinda cute, and they're kinda becoming a HUGE trend in weddings. These string along pennant accents are used all over the place: as decor for a dessert or sweetheart table, lining the ceilings of reception halls everywhere, and as cake toppers. What makes these even more awesome is the fact that they're a CINCH to make and only cost a few bucks...go DIY'ers. At first, the simplistic look didn't quite catch my eye, but after seeing the plethora of ways possible to use this decor concept, I was sold. Popular banners I've been seeing are: draped over the candy buffet (love is sweet), bride and groom photos (i.e. wedding date 6.2.2012), on the back of the getaway vehicle (just married), draped over the sweetheart table, as cake toppers, swizzle sticks, etc, etc, etc! Check out the images below and see why I'm falling in love with this decor.
8.22.2011
Flag Pennant Wedding Decor
They're kinda whimsical, they're kinda cute, and they're kinda becoming a HUGE trend in weddings. These string along pennant accents are used all over the place: as decor for a dessert or sweetheart table, lining the ceilings of reception halls everywhere, and as cake toppers. What makes these even more awesome is the fact that they're a CINCH to make and only cost a few bucks...go DIY'ers. At first, the simplistic look didn't quite catch my eye, but after seeing the plethora of ways possible to use this decor concept, I was sold. Popular banners I've been seeing are: draped over the candy buffet (love is sweet), bride and groom photos (i.e. wedding date 6.2.2012), on the back of the getaway vehicle (just married), draped over the sweetheart table, as cake toppers, swizzle sticks, etc, etc, etc! Check out the images below and see why I'm falling in love with this decor.
8.21.2011
Engagement Photo Shoots. Are. Amazing.
Engagement photo sessions are delightful in so many ways. Capturing the love between you and your fiancee is an easy caveat. However, finding the right location and photographer is a totally separate issue. Then there's the question of what to wear, how to pose, what to do...yada yada yada. An experienced photographer should come prepared with several ideas and suggestions, but keep in mind that you will need to do some legwork yourself in order to translate your expectations into a reality.
As an avid (aka totally obsessed) blog reader, I am constantly saving photos that catch my eye, then categorizing the images in separate folders. Using Google's Picasa, it is simple then to create a collage of my fave photos. So here's my two cents when it comes to booking your engagement photo shoot:
Number 1: The key word of the day is FUN! Repeat, fun fun fun!
2: Bring a collage of pics that have caught your eye, that you may want to try and recreate. This will definitely help your photo taking pro understand what you envision and expect.
3: Bring a change of clothes in an attempt to keep your shoot from becoming stale. Think outside the box. Not a dressy girly girl? Try on a pretty skirt. Put on some bold earrings. Put a tie or cap on your man. Curl or straighten your hair. Better yet, try on a fancy headband, flowers, or feathers...go for bright red lipstick or blue nail polish! Another classic idea is going all au naturel, which is completely timeless and beautiful right down to the very core.
4: Super freaking important! Find a photographer that you are comfortable with. Someone you can joke around with and be silly enough to experiment with ideas that may be a bit out of your comfort zone.
5: Color coordination is not important, but a colorless backdrop may prove to be disappointing. Pick your location(s) wisely, and see if your photographer is ok with hitting a couple different spots.
6: Think about how your photos will be used. For DIY save-the-dates, perhaps you will need to bring some signs or props of some sort (think balloons, sweet treats, mr & mrs signs, bicycle, umbrella, etc.)
As a closing to this post, I'll leave you with a few pics that have stunned, fascinated, and inspired me. Happy engagement photo shooting y'all!
8.20.2011
Jones Soda Custom Bottle Labels
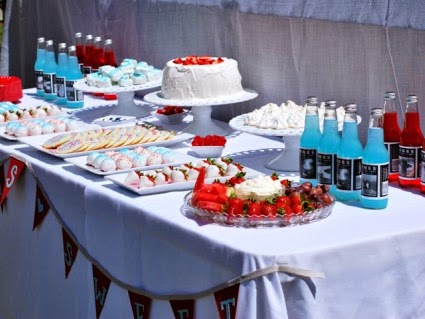
 I found a pretty sweet treat for y'all while browsing on WedLoft.com. If you're in search of an adorable, colorful way to personalize your reception/event, look no more. Why is that, you ask? Because I've found custom bottle labels courtesy of Jones Soda! This Seattle-based company not only offers bev's that are yummy, they're eye candy as well. They come in a wide variety of flavors and colors, and the labels can be fully customized to include a personal photo, blurb about yourself, or any information you deem necessary. At $29.99 per case of 12, these aren't the most budget-friendly alternative to water bottle labels, however, the glass bottle and design altogether hints toward an added level of attention to detail and class. Check out the photos below, and you'll see why.
Here's an original way to display place cards! Attach a tag to the bottle, and offer your party guests a sweet drink when they arrive. It's sure to be a conversation starter that everyone will appreciate. Add your own text, images, and create a one-of-a-kind party favor!

Use the bottles to add a POP of color to any dessert table!

Labels:
bar,
catering,
decor,
Design,
diy,
favors,
gifts,
Inspiration,
Labels,
menu,
Personalized,
Reception,
Sweets
8.15.2011
Custom Stamps for the New Mr. & Mrs.
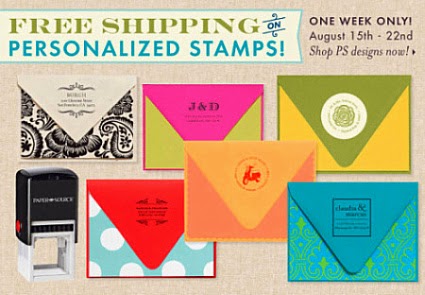
SALE ALERT! These stamps were wayyyy toooooo cuuuuute to not share! How cumbersome and annoying is it to hand-address all of your thank-you cards, (future baby shower invites, perhaps?) and etc. etc. etc? I found these stamps while snooping around on PaperSource, and was excited to learn that you DON'T have to design your own monogram. The lovely folks at PaperSource provide you with pages and pages of pre-made designs, and all you have to do is fill in your info. As a crafty person, I love this website, not only because it is a DIY'ers online bible of paper choices, but the selection here is hard to beat anywhere else. It doesn't matter what your style is, you can find stationary to match here.
On a side note, stamps add a touch of class to snail mail, in my opinion, ten-times better than mailing labels. At $20-$30 each, a little pricey, but I think it's a nice investment. Can you think of a better way to introduce the new Mr. and Mrs. on an envelope? Thought so. Ok, maybe I get a little too excited about not-so-important minute details, but I'm purchasing one of these for myself, so I thought I'd share with y'all as well.
On a side note, stamps add a touch of class to snail mail, in my opinion, ten-times better than mailing labels. At $20-$30 each, a little pricey, but I think it's a nice investment. Can you think of a better way to introduce the new Mr. and Mrs. on an envelope? Thought so. Ok, maybe I get a little too excited about not-so-important minute details, but I'm purchasing one of these for myself, so I thought I'd share with y'all as well.
8.09.2011
You're engaged, now what?! STD's....(AKA Save-The-Dates!)
Being in love and finding out that your significant other wants to spend all of eternity with you makes for some pretty exciting times. But let’s face reality for a sec. Women especially… with us being hormonal creatures and all, can find that love and other things (such as LIFE & WORK & RESPONSIBILITIES) can sometimes get in the way of keeping focused on what to do as you plan for your day of matrimony. Aside from setting an initial budget, getting started on a master guest list, hosting your amazeballs engagement parlay…don’t forget toPICK THE WEDDING DATE! Upon picking such date, it’s time to get your Save-the-Date (STD’s – such a horrible acronym, but I’ll use it anyway in hopes of keeping this short and sweet) reminders sent out to your dearly beloved pals and fam.
SOOOOOO, the question of the day is: would you rather invest the time and money in creating DIY STD’s, or purchase pre-designed, ready-to go STD’s from one of our awesome vendors? I wouldn’t suggest going the DIY route unless you are crafty and are familiar with design software (I prefer Microsoft Publisher), but there’s definitely others (Photoshop, for one).
Many templates can be found for free online (or used as inspiration as you design your own) at Intimate Weddings, HP, Punchbowl, Shutterfly, The Knot (even has the option to send free STD emails!), Magnet Street, Smilebox, Wedding Paper Divas, Minted, Vistaprint…even Google, has some pretty sweet designs. And with Zazzle, you can create custom stickers (think monogram, wedding date, etc) to use in limitless ways!
Since we’re on the subject of STD’s, there’s a bazillion options out there for you to choose from. You could go with the magnet/photo/calendar type (my fave), badges/photo pins (also rad), photo postcards (eye-catching), fancy letterpress or regular stock paper invites (simple, yet classy), e-vites. And the list goes on and on and on.
If you’re opting towards DIY, keep in mind that it may seem like the cheaper alternative, but if you are a perfectionist (like me) and have glorious, VERY SPECIFIC ideas floating around in your head of what you want; the price and time involved may not be worth the stress - especially if you’re tackling this project flying solo.
............In conclusion, happy exploring!! And remember…Envy Events is always ready to lend an extra hand if needed. We are happy, busy little worker bees who loves every and anything crafty…especially wedding-related!
8.06.2011
Not-So-Ordinary Boutonnieres
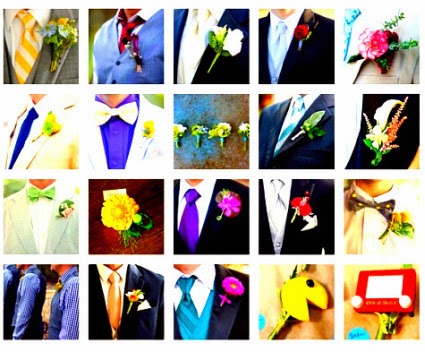
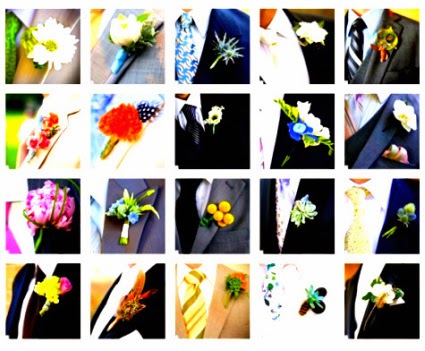
This gallery by TheKnot.com was so intriguing and inspirational, at the very least. A personal touch, even in the smallest of details, allows your guests to get a feel for your love, your relationship, and your individual personalities. A personal touch adds charm to any event, and your guests will appreciate it without a doubt. This gallery captures several ideas, some you may cringe at, others are "jaw-droppingly" gorgeous. Depending on your own sense of style, of course.
Simply put, a boutonniere doesn't necessarily have to be a flower. Anything that is unique is special, even if only to the couple. Whether it's pom-pom's, paper flowers, mini Teenage Mutant Ninja Turtle figurines, or a plastic Pac-Man....It's your day so use your imagination and let the creative juices flow!
8.05.2011
DIY Project - Wooden Table Numbers
As a savvy spender (aka cheap, price aware, whatever you want to call it), I'm always one lookout for DIY projects that will save my clients a few extra bucks. As we all know, the cost of hosting such an elaborate event (perhaps the most important and detailed event you will ever host, ever)....quickly rises. Anytime a vendor hears the word wedding - I'm pretty sure dollar signs start flashing before their eyes. As a firm believer in the fact that newlyweds should not start out their life of matrimony in debt, DIY projects are my fave. Why pay the extra cash when you have the tools and skills necessary to "do it yourself!"
So enjoy... and continue to visit our blog for more projects and inspiration to help you as you plan your perfect day!
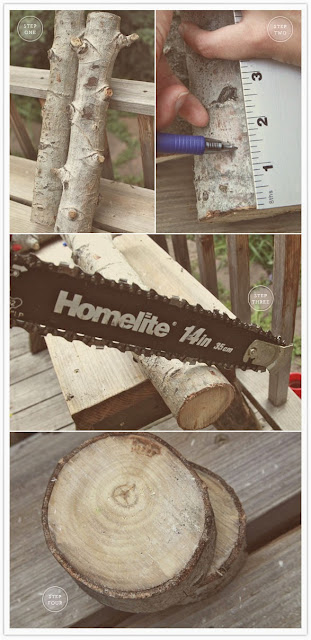
Step 1: Find your wood
Step 2: Use a pen and ruler to mark each increment where you want to make your cuts. You can decide how thick or thin you would like the wood to be, but we chose about 1 1/2 inches (this width enabled the numbers to stand alone or lean against something)
Step 3: Make your cuts. We found a chainsaw to be the most fast, effective way- but my cuts weren’t perfect. Please take care to adhere to proper chainsaw safety (proper eye protection is a must!)- I had my fiancee give me a lesson before we got started. (Note- wood will be grainy when cut with a chainsaw- I liked this look, but if you wanted something more refined you could add an extra step here with a power sander).
Step 4: Make sure you have enough wood rounds for each table.
Source: 100 Layer Cake (a very awesome blog, check them out!)
Xoxo,
Christina Pectol
ENVY EVENTS
M: 253.468.5586
W: envyeventsco.com
Like us on facebook! www.facebook.com/envyeventsco
So enjoy... and continue to visit our blog for more projects and inspiration to help you as you plan your perfect day!
Materials:
- Downed wood (we chose Aspen since it is abundant in our neighborhood, and found a pile of downed trees just a few blocks away- it also happened to be the perfect size I was looking for)
- Chain Saw
- Dremmel with 1/4 inch straight router bit
- Ruler
- Pen
- Dark colored paint + Paint Brush
- Downed wood (we chose Aspen since it is abundant in our neighborhood, and found a pile of downed trees just a few blocks away- it also happened to be the perfect size I was looking for)
- Chain Saw
- Dremmel with 1/4 inch straight router bit
- Ruler
- Pen
- Dark colored paint + Paint Brush
Step 1: Find your wood
Step 2: Use a pen and ruler to mark each increment where you want to make your cuts. You can decide how thick or thin you would like the wood to be, but we chose about 1 1/2 inches (this width enabled the numbers to stand alone or lean against something)
Step 3: Make your cuts. We found a chainsaw to be the most fast, effective way- but my cuts weren’t perfect. Please take care to adhere to proper chainsaw safety (proper eye protection is a must!)- I had my fiancee give me a lesson before we got started. (Note- wood will be grainy when cut with a chainsaw- I liked this look, but if you wanted something more refined you could add an extra step here with a power sander).
Step 4: Make sure you have enough wood rounds for each table.
Source: 100 Layer Cake (a very awesome blog, check them out!)
Xoxo,
Christina Pectol
ENVY EVENTS
M: 253.468.5586
W: envyeventsco.com
Like us on facebook! www.facebook.com/envyeventsco
Step 5: Once you have enough wood rounds for each table number, take a dark pencil or pen and make an outline of each number on the round for you to trace with the dremmel.
Step 6: Use dremmel to “drill into the wood” along the numbers you’ve traced
Step 7: Use brown paint and a skinny paintbrush to paint in indentations.
Step 6: Use dremmel to “drill into the wood” along the numbers you’ve traced
Step 7: Use brown paint and a skinny paintbrush to paint in indentations.
Subscribe to:
Comments (Atom)
